Saturday, July 23, 2011

The Shabby Tulip

Hello faithful readers! This will be my last post on My Grass is Always Greener!!!

Don't be sad, though. You can now find my writing, projects, and art on The Shabby Tulip. I decided recently that, in order for my blog to grow in the DIY/design/decor realm of blogland, my blog needed a facelift. I wanted the name to really portray that direction, so I went ahead and made the move.

Please come visit me at the new location, and don't forget to hit the 'follow button'! :)

Thursday, July 21, 2011

DIY Camera Purse

First of all, I just have to say YAY!!! I just got a new camera! After awhile of lusting after other blogger's crisp detailed beautimous pictures I decided that it was time to invest. My point and shoot was just not cutting it. So I ended up picking up this beauty on ebay...


It's a Canon Rebel XT. Not the best body, but I asked my photographer friend, Sharon, for advice on the matter and for the price, this couldn't be beat.

Anywho, back to the matter at hand. After making the purchase, I decided that I needed something beautiful to carry my most prized possession around in so I started the search. I found a lot of really beautiful bags that looked like purses on Epiphanie and Jo Totes, but they were all upwards of $150!! Um, I shop at thrift stores...hello. So I did what any good DIYer would do. I google searched 'DIY camera bag purse' and there sat my salvation. Vanilla & Lace had posted a way to make your own!! And it's REALLY simple. If you have ever used a sewing machine, you can do this. 


trust me. My husband is better at sewing than I am. I actually had to enlist his help, but the project did get completed.

First, grab your supplies:

**1 yard of the material of your choice. Make it pretty people. (I ended up not even using the whole yard)

**A purse that you love. Target has some bags that are pretty ideal as far as shape, zipper closure, tapered top (so it's easy to carry). I already had this bag, so score! 

**A couple sheets of foam. I have read that some ladies have used 3/4 or 1", but I thought that would be too bulky and kind of unnecessary, so I just went with 1/2". Also, I found a bunch at the B (thrift store) for a quarter, so I made the best of it. Another score! 

**Sewable velcro $1.60

**Unique Stitch $4.50 (or you can just sew the velcro on, but I'm lazy)

These are the measurements i used for my foam, yours will probably be different but overall it should be around the same size.
Bottom pad: 13 1/2" x 4 3/8" using 3/4" foam
Short sides: 4 1/2" x 4 3/8" (make 2)I ended up deciding that I didn't need these, but if you want extra protection they would be great.
Lens dividers: 7 1/2" x 3" 
(make at least 2)
Straight divider: 4 1/2" x 3 1/2" (make 2)
Long side pads: 10" x 4 1/2" (make 2)

Now, use all these foam pieces as a pattern for the fabric, adding about an inch to all sides for seam allowance. Cut two pieces of fabric for each foam insert (obviously!)..
Note: For the lens divider, add 2 inches to the short ends so you have little flaps to sew velcro onto.


To start, I sewed one piece for the long sides and bottom. I started by sewing 3 sides and then I added a piece of foam and then seamed it, added another piece and then seamed it, and then the 3rd piece and then closed it. 


Then I added velcro to both sides (this is what you will be attatching the inserts to)


I decided that Unique Stitch is my new best friend. The velcro is not coming off.
I have seen people use a double row of velcro, but I didn't seem to think it necessary. Oh, and be sure to put to 'soft' side of the velcro here. You don't want fluffies sticking to it constantly.

I then sewed all of my inserts. I made sure to leave a flap on either end to attatch velcro.


I measured to make sure that the velcro strip would match up with the piece on each insert.


This doesn't look too good, but it does match up, I assure you ;)

And that's it!! Pretty simple. It took me about 2 hours, but I bet if I tried it again I could do it quicker. I won't lie to you and say I didn't break out my seam ripper...

A few more pictures of the finished product!!


And a point and shoot picture of it fully loaded!

Hope you all enjoy! Feel free to leave a comment if you decide to try this with a link back to your blog!


Thursday, July 7, 2011

Mustard Mishap

Have you ever had troubles picking paint colors? If not, I think you are part of, mmm, 1% of the population...either that or you're male (my husband could care less). Wehehell, let me tell you a little story about picking the color yellow.

Apparently (and I should know this because I paint) yellow is easy to mess up. In my head, I had the perfect earthy-mustard colored wall behind the couch in my living room...it was beyond cute...like sink-into-the-couch-and-read-forever/coziness kind of cute. Ya. Right.

I ended up with this:


You may be thinking, "Oh, that's not so bad...". I can assure you. It's so bad. It looks way worse in person. My terrible point and shoot camera cannot capture the hideousness. It has this awful puke green undertone that actually gives me a headache. You would think it's 'that bad' if I told you that I was going for "cottage chic".  epic fail.

But, I'll just have to brush this one off and try again, right? I just thought I'd let you know that you're not alone. I make terrible choices also. Stay tuned to see what I come up with next! :) 

Wednesday, July 6, 2011

Flag Cheesecake

Hola patriotic peeps! (After I typed that I laughed out loud. Is that like sacrilegious? Sacrilanguage? Sacripatriotism?)

Anyway, I hope you all had a happy 4th! I got to spend some time with the hubs out on the town. That's right, in Buena Vista...it's a town:)  We attended the town parade which turned out to be quite the spectacle...it lasted 1 1/2 hours! Holy parade overload batman! That evening we went to our dear friends, the Flowers, for hamburgers and fireworks and then a much needed poker game. So fun!!

Sunday the 3rd, Cornerstone had their annual "Church in the Park" service with eats after, and I brought this beauty!


Mmm. That's right. It's a Flag Cheesecake. I got the recipe HERE.  It was a total hit! The best part? You don't have to decorate it like a flag! Use your imagination people. Birthdays, Christmas, and to stick with the theme, maybe a Mexican flag for their independence.  I'm not judging, you can celebrate it. I'll look for any excuse to make this again! 

One little disclaimer for this recipe...actually two. MAKE SURE YOU HAVE ENOUGH TIME!! I had never made a cheesecake before, so I didn't realize there is a lot of waiting around for cooling time. Thus, I ended up staying up til 1 am finishing this thing. #2 HAVE A PLATTER BIG ENOUGH!! I don't. Imagine my feelings of grief when I realize that I have nothing to serve this mammoth on...it's 13x18. I ended up borrowing a tray from my dear friend and savior (of the day...no more sacrilegious-ness here) Leslie. Thanks Les! 

Anyway, I highly recommend this cake! Lot's of compliments may have led to the inflation of my head, but hey, it was grand. Enjoy!

Friday, July 1, 2011

Hi Again! and House Remodel

Well, Hello!! No, I am not dead, did not stop blogging, did not run away and join a convent, and, No, I did not fall in...

I have just needed a break, I think.

Updates! We "finished" our upstairs remodel!! You may be thinking, "Why is 'finished' in quotations?". If any of you have attempted a project of this magnitude, you realize that "finished" will forever be in quotations. It's never "finished".  :) That said, I have a few pictures for you! Keep in mind, the decorating has only just begun!


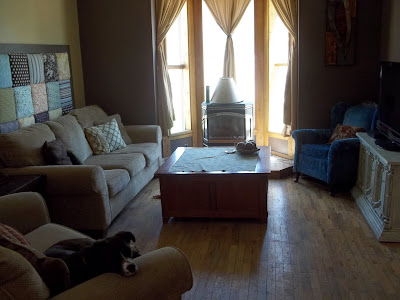
Our living room. Yes, that is a headboard behind the couch:)


I feel like this is 'Where's Waldo'. Only the much more obvious version. Bella sneaks into a lot of my shots...


My credenza being put to good use. The chair in the corner will be getting a makeover...just haven't decided what fabric to use yet. Ideas?  Oh, and if any of you have a good color to replace the gawd-awful tan devouring the potential of my living room, please do share!


My Craft Corner. What? That's right. My own little corner.

Don't you love the desk? I am in lust with it. I like to stare.


My Sweet dining set. Thank you to my dear friends Kirk and Brenda for the gift. We will think of you every time we eat/spill on it. 


See the AWESOME vintage camel-back trunk my mother-in-law gave us? Thanks Lisa!!


And this is the Love Nest. Ha. Nowhere near decorated, but it's a nice start...


My new beautimous bedding from Target! I LOVE having white bedding. No those curtains aren't the shams...ppshh. Who would do that? (um, someone who likes to take the easy route--ie. NO SEW:)


A close up of one of my gorg milkglass thrift store lamps. And I found the sweet shades at the Family Dollar. Who knew?


And the view from our bedroom window...not too shabby if you subtract the pole.

So, the moral of the story is--we still have a long way to go! But man does it feel ultra-fantastic to have come this far!!! If you would like to see some before photos, refer to THIS POST.

Don't forget to hit the 'follow' button if you love me. Because I love you. :)

Monday, May 30, 2011

Yes, We're in the Mafia

Last night I threw Robin a birthday party. My good friend Traci's birthday was yesterday, so we made it a joint party! It was also kind of a house warming/summer kickoff type event. And you know what that means!? Our house remodel is done!!!  You have no idea how much of a relief it is:) I will be posting pictures soon of the transformation! Now to the good stuff.

The party was Mafia themed. That's right. Here are some great moments captured on camera.


The Ladies.


With the addition of a few late comers and...Steve? Steve. You're attire isn't feminine enough to qualify you for appearance in this photo.


Robin, Luke, and Kyle. Luke is making me a tad uncomfortable...


Nate (wearing his best dress shoes:), Charlie, Robin, and Steve. Again with the leg lift...they were taking too many pointers from the ladies.


The whole crew. Yep, we're cool like that.


My attempt at hurriedly decorating a birthday cake. Luckily Traci and Robin were both turning 27:) And those are roses. Not blood. Don't judge me.


Me, Leslie, and Traci. Don't you love our guns? This is probably the only time you'll ever see Leslie holding one...that's because it's of the water variety:)


One more smile for the camera to end a great night!

About 11 or so, we decided it would be fun to go down to The Rope (local bar pretty much in my back yard) and shoot some pool. You should have seen the looks we got when we walked in.  Everyone loved it so much that they started playing swing music for us to dance to :) It was quite fun. I definitely recommend a costume party. Consider our house warmed.


Tuesday, May 17, 2011

Painted End Table

My little sister was saying the other day that she really needed another end table for beside her bed. So, me being me, I said I had one that I could paint for her. Yes people, I do this to MYSELF. Her bedroom is is Yellow & Gray, so I decided to paint it to match.

Here is the BEFORE:


Not anything fancy...Robin's mom just gave it to me:) It's unfinished wood. Bella likes to pose in my pictures...

And here's the AFTER:


So pretty, right? So here's how I did it:

1. WIPE it down! Really well. If you miss some dirt, the spray paint will not dry well and it will look speckle-y. 

2. Use a spray primer. I used Rust-O-Lium, but I actually prefer KILZ. If you want to be super lazy, Krylon makes a "No-Prime" spray paint, but I think it's still safer to use a primer.

3. Krylon white spray paint! I love it! It gives GREAT coverage. Make sure to do THIN coats. It's better to have to do more coats than have drips.

4. I taped off some random lines on the top and alternated painting them black and gray.


Like so.

5. Painted the front section yellow.

6. Added yellow dots to the far right gray section.
7. Polyurethane. Because I used acrylic paint (it was what I had), I decided it needed a topcoat. This will prevent chipping, scratching, etc. They make spray versions of it, but I had a quart of brush-on so that's what I used.  
TA-DA! Done. It only took about 2 hours, but that's only due to spray paint drying time.

P.S. If you love reading my blog, go ahead and hit the FOLLOW button! I'd pretty much love you for it! Not even pretty much. I just would. 

Sunday, May 15, 2011

A crap-ton of projects

Oh man peeps. I have had about a million things going on in my life this month. I have so many, SO MANY I TELL YOU projects in the works...hence the absence from blogging.

We are remodeling the upstairs of our house this month and trying to do it very quickly! I have set us a deadline of May 29 Robin's Mafia Themed Birthday Party and I am sincerely hoping it's done. Today is actually Robin's birthday. I got him a tie. I know it's boring, but the man is impossible to shop for. So he gets a nice green striped tie.

Here are a few random things that I have been up to lately:


This is a painting I did yesterday. It's for a dear friend that is moving to the Dominican Republic to teach! So she will always remember our beautiful mountains:)


I lettered this chalkboard for some good friends that opened a new restaurant (Punky's Smokehouse BBQ). I used chalk markers...they're the bomb.com. No smears!


I painted this mural for my sweet friend Lacee. She is having a baby girl in a little over a week!


This is also her changing table. I just painted it pink and then mod-podged some fabric and trim on the top and front. SO cute in the nursery!


A dear friend and I were forced into volunteered to help renovate and revamp the 3-5 yr. old sunday school room at our church.  It is a "Colorado Cabin" theme...so cute.  This is the only picture that I snapped, but it came out stinkin awesome! These are the tree stump tables that I painted in various stages of completion. I'll try to post some of the finished room soon. 


I finally sat down and got a sewing lesson from my mom! A friend had given me her old sewing machine, and I had never even opened it until this past week. I have so many projects requiring spray paint at the moment, and when it snowed last week (in May, I might add) I decided it was time! This pillow was the byproduct. For a tutorial on how to make it (It's a removable pillowcase type thing...washable!) visit THIS SITE. 

My mom was the mastermind behind the ruched embellishment, and I think I would be horrible at explaining it, so...I won't;) Sorry, but if I tried, you wouldn't get it anyway. I'm that bad.


These are my new dining chairs (sitting on my turf. I know you're jealous)! That's right people. I am going to have a dining room! I give you permission to do a celebratory dance move. Go ahead, you know you want to.

This is what they looked like BEFORE:


I only have 2 done, and I have 6 more to go...some aren't pictured. If you look closely you can see the finery that is the palm tree fabric. Why did I ever think they needed a makeover? For a tutorial on reupholstering chairs, visit VINTAGE REVIVALS. Which is coincidentally my favorite blog ever. The chair in her post is a lot more difficult (not just a seat) but I think she gives some good pointers.

So this is just a sneak peek at the scheme of my soon to be dining room:) Stay tuned for the final product! 


I made this wreath for my mom for mother's day. I think it turned out cute and was super cheap. Plus it's homemade...mom's love that crap. I'm pretty sure she still has stuff that I made her from the 2nd grade. 

I just took a wreath form that I bought at a thrift store ($.25) and wrapped it in cream colored yarn ($3). Then I added hot-glued fabric rosettes on it (which I made out of scrunchies from Family Dollar), and then stamped 'happiness' on some cardstock and glued that on the bad boy too. Super easy!


Also, I started a pantry redo. This is the before shot. Please excuse me while I go cry in the corner.

I haven't finished it yet, so this is all you get for now...but let me just tell you...IT'S AMAZING!!


WHEW! I told you I have been busy! 

P.S. If you love reading my blog, don't forget to hit the follow button! I'd pretty much love you for it. Not even pretty much. I just would.